Build a Custom WSL 2 Kernel in 2026
Building a custom WSL 2 kernel in 2026 with the WSL system distro (Azure Linux) as a clean, root, throwaway build environment. KVM now ships enabled, so this covers the reasons that still matter, plus the new modules VHDX deployment step.
WSL 2 ships with its own kernel: a Microsoft-maintained fork of the Linux kernel, updated regularly and tested against Windows. For most workloads it is exactly what you want. But sometimes you need a module that is not compiled in, an out-of-tree driver, a pre-release upstream feature, or a custom patch. That is when you build your own.
This post updates the 2021 openSUSE kernel build guide for 2026. The shape of the process is the same: get the source, configure, build, point .wslconfig at the result. Three things have changed. The build environment is now already on your machine, hidden inside WSL itself. Modules now ship as a separate VHDX. And the build needs real disk, which takes one extra step to arrange.
First, do you actually need a custom kernel?
In 2021, the most common reason to build a custom WSL 2 kernel was nested KVM. The stock kernel did not enable it, so running KVM guests inside WSL 2 meant compiling your own. That reason is gone. The current 6.18 config enables KVM as modules out of the box:
CONFIG_KVM=m
CONFIG_KVM_INTEL=m
CONFIG_KVM_AMD=m
To use it, you do not build anything. You set one option in %USERPROFILE%\.wslconfig:
[wsl2]
nestedVirtualization=true
This is the default on Windows 11. Run wsl --shutdown, start a distro, and /dev/kvm is there. Note that nested virtualization is x86 only: WSL on ARM64 boots the VM at exception level EL1, and KVM requires EL2. There is no kernel config that works around that (see issue #9794).
So what is left as a real reason to build in 2026?
- Modules that are not enabled. A driver or netfilter module you need is not in the default config. This is the most common case.
- Out-of-tree drivers. Custom hardware or proprietary modules that have to be compiled against the kernel tree.
- Upstream features ahead of the Microsoft release. A mainline feature landed that has not made it into a tagged WSL kernel yet.
- Custom patches. Experimental changes, performance tuning, or a backport you are testing.
- Filesystem or subsystem support not compiled into the stock kernel.
If none of those apply, you are better off staying on the stock kernel and letting Microsoft update it for you. If one of them does, read on.
The build environment: the WSL system distro
WSL 2 ships with a hidden system distribution: a minimal Azure Linux instance that WSL uses internally. You reach it with wsl --system. It runs as root, uses tdnf (Azure Linux's package manager) for packages, and is separate from any distro you have installed.
Building here has one real advantage: it is the same set of steps no matter which distro you actually run. Ubuntu, Fedora, openSUSE, or Pengwin, the kernel build does not touch them and does not depend on their package managers or library versions. You get one recipe, run against the same Azure Linux toolchain Microsoft itself builds with.
One caveat: the system distro is ephemeral. It shuts down after about a minute of inactivity, and packages you install with tdnf do not survive a full wsl --shutdown. So work in one sitting. Open a root shell and keep it open, and the distro stays alive for as long as you need it:
wsl --system --user rootEvery command below that does not start with wsl or usbipd runs inside that shell.
A disk-backed workspace
There is a catch the 2021 guide never had to deal with. The system distro's filesystem is backed by RAM, not disk. Its scratch space is capped at roughly half the memory assigned to the WSL VM. On a machine with 8 or 16 GB, that is not enough room for a full kernel tree, and the final link step can run the VM out of memory and get killed before it produces a vmlinux.
The fix is to give the build real disk: create a virtual disk, attach it to WSL, and build on it. The build files then live on disk instead of in RAM, which both removes the size ceiling and leaves memory free for the linker. As a bonus, the disk is a file on your Windows drive, so your source tree survives a wsl --shutdown. Only the tdnf packages need reinstalling next time.
Create a 40 GB expanding VHDX. It only consumes the space you actually write. From inside the system distro:
tdnf install -y qemu-img
qemu-img create -f vhdx /mnt/c/Users/YourWindowsUsername/wslbuild.vhdx 40G
If you prefer Windows-native tooling, an elevated diskpart (create vdisk file=... maximum=40960 type=expandable) or PowerShell New-VHD produces the same file.
Attach it to the WSL VM as a bare block device. This runs on the Windows side, and for a VHD file it does not need administrator rights:
wsl --mount --vhd C:\Users\YourWindowsUsername\wslbuild.vhdx --bareBack in the system distro, format it once and mount it. Give it a label. The kernel disk is one of several block devices in the VM, and the device letters (/dev/sdc, /dev/sdd, and so on) shuffle from one boot to the next, so addressing it by label saves you from mounting the wrong thing:
# find the 40 GB disk with no mountpoint
lsblk -o NAME,SIZE,TYPE,MOUNTPOINT

mkfs.ext4 -L wslkbuild /dev/sdX        # first time only
mkdir -p /mnt/build
mount -L wslkbuild /mnt/build          # or: mount UUID=... /mnt/build
Do all your work under /mnt/build. To pick up a later session, reattach with the same wsl --mount command and remount by label. The source tree is exactly as you left it, and you only reinstall the packages.
Prerequisites
Install the build dependencies with tdnf. The system distro is minimal, so this list spells out things you would take for granted on a desktop distro, including the assembler and linker (binutils). A few are easy to miss, and the old Ubuntu guide got one of them wrong:
ca-certificates: the system distro ships without CA certificates, sogit cloneover HTTPS fails with SSL certificate problem: unable to get local issuer certificate until you install them and runupdate-ca-trust.glibc-develandkernel-headers: you do need both. The kconfig host tools include the C library and Linux UAPI headers, and without them the build stops almost immediately withfatal error: sys/types.h: No such file or directoryorfatal error: linux/limits.h: No such file or directory.gawk: the system distro's defaultawkis BusyBox, which does not escape quotes the way the kernel's KDB command-table generator expects. Leave it in place and the build fails compilinggen-kdb_cmds.cwithexpected ',' or ';'. Installing thegawkpackage is not enough on its own, because/usr/bin/awkstill points at BusyBox. Repoint it.
tdnf install -y \
    git gcc binutils make flex bison bc gawk perl tar diffutils \
    util-linux kmod e2fsprogs qemu-img dwarves python3 python3-pyyaml \
    openssl-devel elfutils-libelf-devel ncurses-devel zlib-devel \
    ca-certificates kernel-headers glibc-devel
update-ca-trust
ln -sf "$(command -v gawk)" /usr/bin/awk
Getting the kernel source
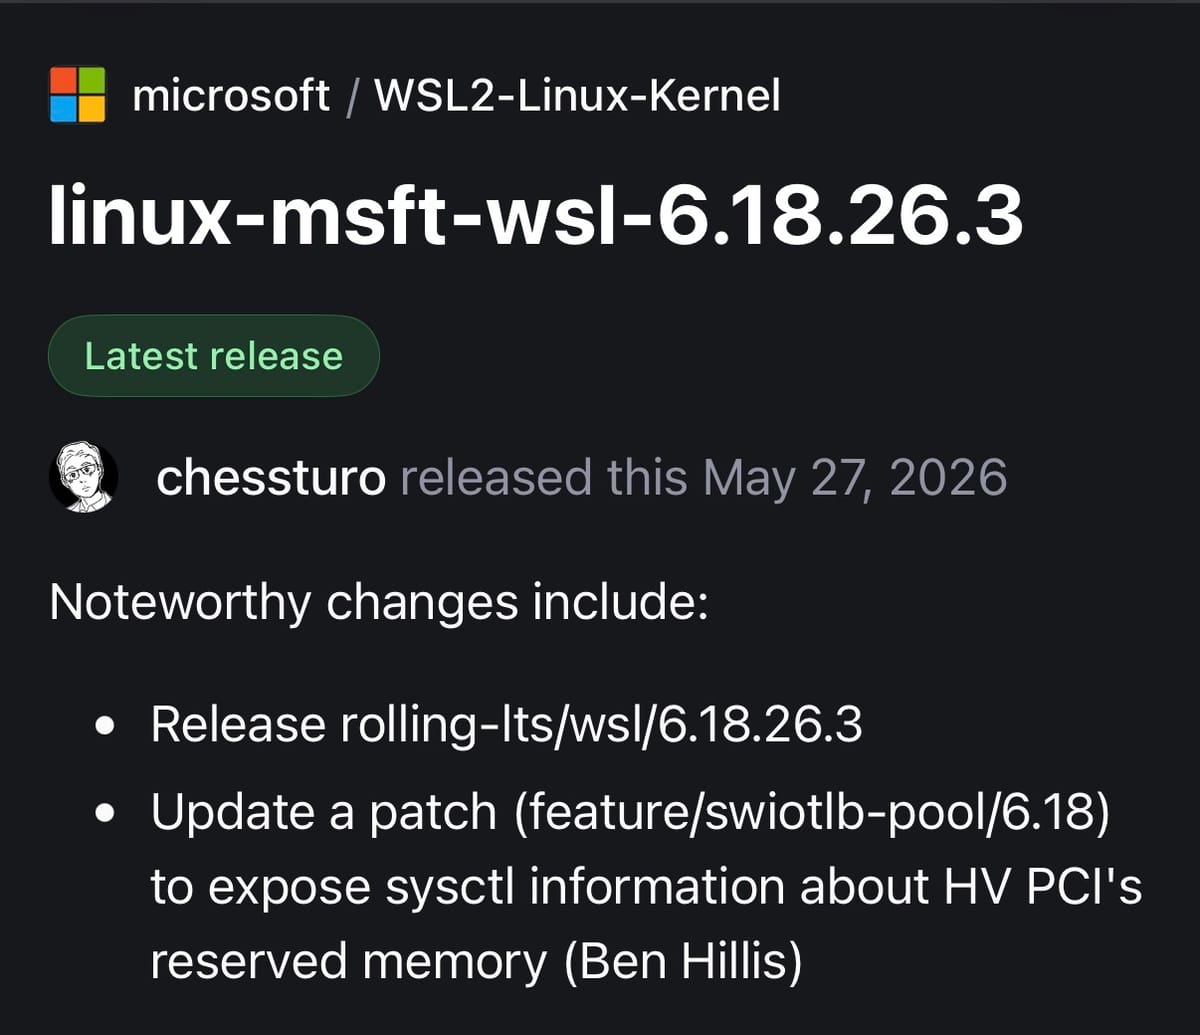
Microsoft publishes WSL 2 kernel releases at github.com/microsoft/WSL2-Linux-Kernel. There are two active lines as of mid-2026:
- Rolling:
linux-msft-wsl-6.18.x.y, currentlylinux-msft-wsl-6.18.26.3 - LTS:
linux-msft-wsl-6.6.x.y, currentlylinux-msft-wsl-6.6.123.2
The version format is linux-msft-wsl-<upstream version>.<Microsoft revision>. Clone the tag you want into the workspace with a shallow checkout to save time:
cd /mnt/build
git clone --depth=1 -b linux-msft-wsl-6.18.26.3 \
    https://github.com/microsoft/WSL2-Linux-Kernel.git
cd WSL2-Linux-Kernel
The config
The kernel repository ships Microsoft's WSL configs:
Microsoft/config-wslfor x86_64Microsoft/config-wsl-arm64for aarch64
One thing that trips people up: Microsoft/config-wsl is a symlink. The real file lives at arch/x86/configs/config-wsl (around 220 KB). If you edit through the symlink, you are editing the real file, which is fine. make follows it correctly.
Always start from this config. It carries the Hyper-V integration options WSL needs to boot: CONFIG_HYPERV, CONFIG_VSOCK, CONFIG_HYPERV_VSOCKETS, and the rest. Build from a generic distro config instead and WSL will hang on startup with HCS_E_CONNECTION_TIMEOUT (issue #10212).
To customize, copy the config and edit it, or use menuconfig:
make menuconfig KCONFIG_CONFIG=Microsoft/config-wslEnable what you need, keep everything WSL relies on, and save back to Microsoft/config-wsl.
One optional change is worth knowing about. The stock config builds with full debug info (CONFIG_DEBUG_INFO plus BTF). That roughly triples the size of the build tree and every module, and makes the link slower and hungrier for memory. WSL ships its modules stripped anyway, so unless you need BTF for eBPF CO-RE work, turning it off builds faster on less disk:
./scripts/config --file Microsoft/config-wsl \
    -d DEBUG_INFO_BTF -d DEBUG_INFO_BTF_MODULES \
    -d DEBUG_INFO_DWARF_TOOLCHAIN_DEFAULT \
    -d DEBUG_INFO_DWARF4 -d DEBUG_INFO_DWARF5 \
    -d DEBUG_INFO_REDUCED -e DEBUG_INFO_NONE
make KCONFIG_CONFIG=Microsoft/config-wsl olddefconfig
Clearing only one of these does not stick. olddefconfig turns debug info back on through whichever DWARF option is still selected, so you have to disable them together and enable DEBUG_INFO_NONE in the same pass.
Building
Build the kernel image with all cores:
make KCONFIG_CONFIG=Microsoft/config-wsl -j$(nproc)Build time scales with core count. On 8 cores this is 10 to 15 minutes; on 4 cores expect closer to 40. The image lands at arch/x86/boot/bzImage (x86_64) or arch/arm64/boot/Image (aarch64).
The modules VHDX
This is the step that did not exist in the 2021 guide. Recent WSL kernels distribute their modules as a separate ext4 VHDX rather than expecting them on the distro filesystem. If you skip this, your kernel boots but lsmod comes up short and anything depending on a module fails. Build and package the modules:
make INSTALL_MOD_PATH="$PWD/modules" INSTALL_MOD_STRIP=1 \
    KCONFIG_CONFIG=Microsoft/config-wsl modules_install

SUDO_USER=root bash ./Microsoft/scripts/gen_modules_vhdx.sh \
    "$PWD/modules" \
    "$(make -s KCONFIG_CONFIG=Microsoft/config-wsl kernelrelease)" \
    modules.vhdx
INSTALL_MOD_STRIP=1 strips the modules as they install, which is how WSL ships them and keeps modules.vhdx small. The gen_modules_vhdx.sh script formats an ext4 image, packs the modules tree into it, then converts that image to VHDX with qemu-img, which is why it is in the package list above. It has a bash shebang, so run it with bash rather than sh. It chowns the result to $SUDO_USER at the end, so run it under sudo or set SUDO_USER as above, otherwise it errors on that final chown after the image is already built.
Installing
Copy both artifacts out to your Windows home directory. Replace YourWindowsUsername with your actual username.
cp arch/x86/boot/bzImage \
    /mnt/c/Users/YourWindowsUsername/wsl2kernel
cp modules.vhdx \
    /mnt/c/Users/YourWindowsUsername/wsl2modules.vhdx
Point %USERPROFILE%\.wslconfig at both. Backslashes must be doubled:
[wsl2]
kernel=C:\\Users\\YourWindowsUsername\\wsl2kernel
kernelModules=C:\\Users\\YourWindowsUsername\\wsl2modules.vhdx
If .wslconfig already has a [wsl2] section, add these lines to it rather than starting a second one.
Restarting and verifying
Shut everything down so the new kernel loads:
wsl --shutdownOpen a distro and check the running kernel and your modules:
uname -r
lsmod
uname -r should show the version you built, for example 6.18.26.3-microsoft-standard-WSL2+. The trailing + is the kernel's own marker for a tree built outside a tagged release, so it is a quick way to confirm you are running your build and not the stock one. If it still shows the stock version, the shutdown did not take: close every WSL window and run wsl --shutdown again.
Example: a USB driver, then usbipd
One case ties the whole thing together. WSL can attach physical USB devices through usbipd-win, but an attached device only works if its driver is in your running kernel. Many common ones are already there. The CP210x and FTDI USB-serial chips, for instance, now ship as modules in the stock config, which is why flashing an ESP32 from WSL works out of the box today. It did not in the early 5.10 WSL kernels, where that driver was absent and a custom build was the only way to get a working /dev/ttyUSB0.
Some are still not built. A USB-to-I2C bridge like the CP2112 (CONFIG_HID_CP2112), or a generic Tiny-USB I2C adapter (CONFIG_I2C_TINY_USB), is not in the stock 6.18 config. If you want to drive I2C sensors or an EEPROM from WSL over one of these, enable the module, rebuild with the steps above, and deploy the new kernel.
Then attach the device. On Windows, from an elevated prompt:
usbipd list
usbipd bind --busid <busid>
usbipd attach --wsl --busid <busid>
Inside WSL, confirm it arrived with lsusb and watch the driver bind in dmesg. A serial device gives you a /dev/ttyUSB0; the I2C bridge gives you a /dev/i2c-* node. The full attach workflow is in the Microsoft USB documentation.
Reverting
To go back to the stock kernel, comment out both lines:
[wsl2]
#kernel=C:\\Users\\YourWindowsUsername\\wsl2kernel
#kernelModules=C:\\Users\\YourWindowsUsername\\wsl2modules.vhdx
Then wsl --shutdown and reopen. When you are done with the build disk, detach it on the Windows side with wsl --unmount. The VHDX file stays put for next time.
Staying current
Microsoft tags new kernel releases regularly. When one lands at github.com/microsoft/WSL2-Linux-Kernel, reattach your workspace, git fetch the new tag, reapply your config changes, and rebuild. Because the source tree lives on the VHDX, you are not starting from an empty clone each time. Only the system distro's packages need reinstalling, and there is no toolchain to maintain and no state to drift.
Build it once. Ship the result.